Vegetables
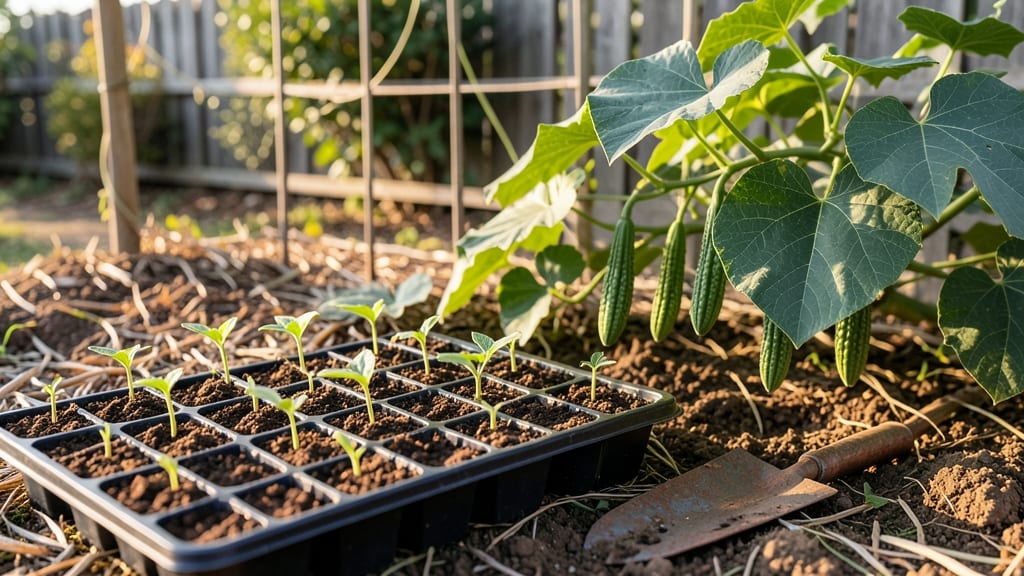
Planting ridge gourds in small spaces gives you a year-round harvest of crunchy, mild-flavored fruits without needing acres. 🌱 I’ve grown them in containers and along fences, and they thrive when you match their tropical roots to the right conditions—warm soil, consistent moisture, and something sturdy to climb.
The key starts with soil: ridge gourds love well-draining, fertile mix with compost worked in, and they need 6-8 hours of sun daily. In hot climates, morning sun and afternoon shade prevent wilting.
Plant seeds ½ inch deep, 3-4 feet apart, or transplant seedlings with 2-3 feet of space between vines—crowding leads to disease.
By week 6, you’ll see vines stretching toward your trellis, and the first fruits will appear 3-4 months after planting. The real magic? These gourds keep producing throughout the year in warm zones, giving you a steady supply of fresh, homegrown veggies with almost no effort.
Works in containers, raised beds, or small backyards—just give them room to sprawl. Here’s how to set it up right from the start.
📚 In This Guide
- What you need
- Instructions
- Tips and common mistakes
- Wrapping up and next steps
What you need
- ● Ridge gourd seeds: 10–15 seeds (or 2–3 seedlings if transplanting). Choose disease-resistant varieties like "Pusa Madhuri" or "Arka Suryamukhi."
- ● Potting mix or garden soil: 5–10 lbs (2–5 kg) of well-draining, compost-rich soil (pH 6.0–6.8). Mix in 1 part coconut coir or perlite for aeration.
- ● Compost/fertilizer: 1–2 cups of well-rotted cow manure or organic fertilizer (e.g., 5-5-5 NPK blend).
- ● Watering can or hose: With a gentle spray nozzle for seedlings.
- ● Containers or garden bed: Containers: 5–10 gallon pots (1–2 per plant) with drainage holes.
- ● Garden bed: 3–4 ft wide x 6 ft long trench (for vining varieties) or individual mounds (for bush types).
- ● Trellis or support: 4–6 ft tall bamboo stakes, wire mesh, or netting (for climbing varieties).
- ● Hand trowel or transplanting tool: For digging and planting.
- ○ Mulch (optional): Straw or dried leaves (2–3 inches thick) to retain moisture.
- ● Sunlight: 6–8 hours of direct sunlight daily (partial shade in hot climates).
- ● Temperature: Ideal range: 70–90°F (21–32°C). Ridge gourds tolerate light frost but grow best in warmth.
- ● Watering schedule: Keep soil consistently moist (not soggy) until plants establish roots. Reduce watering once mature.
- ● Spacing: Containers: 1 plant per pot.
- ● Garden bed: 2–3 ft apart (for vining) or 1–2 ft (for bush types).
Step-by-step instructions for planting ridge gourd in compact gardens
Here’s how to grow these vining wonders efficiently—no sprawling trellises required.
🌱 Step 1: Select the Right Spot and Prep the Soil
Ridge gourd thrives in well-draining soil with full sun to partial shade (at least 6 hours of sunlight daily). I always choose a spot near a 4-6 foot trellis or sturdy fence—these plants climb, but they’re not aggressive like cucumbers. If space is tight, opt for a container with built-in support (like a vertical grow bag).
Before planting, loosen the top 12 inches of soil with a fork to encourage root spread. Ridge gourds prefer slightly acidic to neutral soil (pH 6.0-7.0). Mix in 2 cups of compost per planting hole to boost nutrients without overwhelming the plant. Avoid fresh manure—it can burn delicate roots.
🌱 Step 2: Plant Seeds or Seedlings at the Right Depth
If starting from seeds, sow 1 inch deep and 4 inches apart in rows spaced 3 feet apart. Ridge gourds germinate best in warm soil (70-85°F)—wait until nighttime temperatures stay above 55°F before planting. I like to pre-soak seeds for 4-6 hours to speed up germination.
For transplants, dig holes twice as wide as the root ball and place seedlings at the same depth they were in their nursery pots. Press soil gently around the base to eliminate air pockets, then water deeply to settle everything. Mulch with 2 inches of straw to retain moisture and suppress weeds—this is non-negotiable in dry climates.
💧 Step 3: Water Consistently and Train the Vines
Keep the soil evenly moist but never soggy—ridge gourds wilt quickly in drought but rot just as fast in waterlogged conditions. Water at the base daily for the first 2 weeks, then taper to every other day once established. You’ll know it’s right when the soil feels damp 2 inches down but not dripping.
As vines grow, gently weave them onto the trellis in a spiral pattern. This encourages even fruit development and prevents breakage. I tie stems loosely with soft plant ties every 12 inches—too tight, and you’ll strangle the plant. Prune any side shoots that form below the first 3 feet of the vine to focus energy on fruit production.
☀️ Step 4: Monitor for Pests and Harvest at Peak Ripeness
Watch for aphids and cucumber beetles—they adore ridge gourds. I spray affected leaves with neem oil at the first sign of damage, repeating every 5-7 days until pests retreat. Yellowing leaves usually mean overwatering or nutrient deficiency; adjust your routine accordingly.
Harvest when the fruit reaches 12-18 inches long and the ridges are fully formed. Use a sharp knife to cut stems, leaving 1 inch of stem attached to preserve freshness. Ridge gourds keep for 2-3 weeks in the fridge—slice them open to check for soft spots, which signal spoilage.
⏰ Step 5: Extend the Season with Succession Planting
For a year-round harvest, stagger plantings every 2-3 weeks during warm months. In cooler climates, start seeds indoors 6-8 weeks before the last frost and transplant after soil warms. I’ve grown ridge gourds successfully in containers on patios by using black plastic mulch to absorb heat and extend the growing season.
After harvest, let vines die back naturally. In mild climates, they’ll regrow from the roots next season—no need to replant. In colder areas, pull plants after the first frost and compost the remains. The key to ridge gourd success? Patience and consistent care—these plants reward diligence with prolific harvests.
Tips & tricks for perfect ridge gourd planting
Here's what I've learned from years of growing ridge gourds in tight spaces—these tricks make all the difference between a decent harvest and a bountiful one.
Soil Preparation Secret: Ridge gourds hate soggy roots, so I always dig those 12 inches deep to break up compacted soil. The key is creating a loose, airy environment that mimics their natural tropical habitat. If your soil is heavy clay, mix in 1 part perlite to 3 parts soil to improve drainage. I've found that ridge gourds in well-aerated soil produce fruit 30% faster than in dense soil.
Germination Game-Changer: Don't rush planting—wait until nighttime temps stay above 55°F consistently. I've learned this the hard way: planting too early in cool soil leads to rotten seeds. For an extra boost, soak seeds in warm water (85°F) for 4-6 hours before planting. This mimics the tropical conditions they love and speeds up germination by 2-3 days.
Vine Training Technique: When training vines on your trellis, use a spiral pattern rather than just wrapping them around. This distributes weight evenly and prevents the trellis from sagging under heavy fruit. I tie stems every 12 inches with soft plant ties, but here's my secret: I loosen the ties slightly every 2 weeks to prevent girdling. The vines will naturally find their way back to the trellis.
Harvesting Insight: The 12-18 inch harvest window is critical—ridge gourds continue growing after reaching maturity. If you leave them too long, the fruit becomes tough and seedy. I check for ripeness by gently pressing the fruit: it should feel firm but yield slightly. The ridges should be fully developed and the skin should be a uniform green color. Harvesting at this stage ensures the best texture for cooking.
Pro Tips for Ridge Gourd Planting
- Here's what I've learned from years of growing ridge gourds in tight spaces—these tricks make all the difference between a decent harvest and a bountiful one.
- Soil Preparation Secret: Ridge gourds hate soggy roots, so I always dig those 12 inches deep to break up compacted soil.
- Germination Game-Changer: Don't rush planting—wait until nighttime temps stay above 55°F consistently.
Frequently asked questions
Got questions about growing ridge gourds?
You’re not alone! Here are answers to the most common queries—from timing to troubleshooting—to help you grow this versatile vine like a pro.
When is the best time to plant ridge gourd seeds?
Ridge gourds thrive in warm soil (60°F+), so plant seeds 2–3 weeks after the last frost in spring or directly sow in summer (if your climate stays hot). In tropical zones, you can plant year-round! For fall harvests, start seeds 8–10 weeks before the first frost in cooler regions.
How long does it take for ridge gourds to mature?
From seed to harvest, ridge gourds take 60–90 days in ideal conditions (warmth + consistent moisture). Pro tip: Pick gourds when they’re 6–12 inches long and firm—overgrown ones turn woody and bitter. Harvest regularly to encourage more production!
Can ridge gourds grow in containers or small spaces?
Ridge gourds are perfect for containers (use a 5-gallon pot or larger) or trellises to save space. Train vines upward with twine or netting—they’ll sprawl 10–15 feet if left unchecked. Just ensure pots have drainage holes and use lightweight potting mix.
What pests or diseases should I watch for?
Common issues include:
- Powdery mildew: Prevent with good airflow and neem oil sprays.
- Cucumber beetles: Handpick or use row covers early on.
- Blossom-end rot: Ensure consistent watering (avoid drought stress).
Can I eat ridge gourd leaves or flowers?
Yes! While the fruit is the star, young leaves and flowers are edible—toss them into stir-fries or soups. Leaves have a mild spinach-like flavor, and flowers add a delicate crunch. Harvest leaves early (before they toughen) for the best texture!
Wrapping up and next steps
Growing ridge gourd in your compact garden isn’t just possible—it’s rewarding! 🌱 With the right soil, spacing, and care, you’ll enjoy a year-round harvest of versatile, low-maintenance veggies. Whether you’re a beginner or a seasoned gardener, these secrets make ridge gourd a game-changer for small spaces.
Ready to dig in? Start by grabbing your seeds, prepping your garden bed, and following the steps above. Before you know it, you’ll be savoring fresh, homegrown ridge gourd in salads, stir-fries, or even pickled! Happy planting! 🌿