Planting
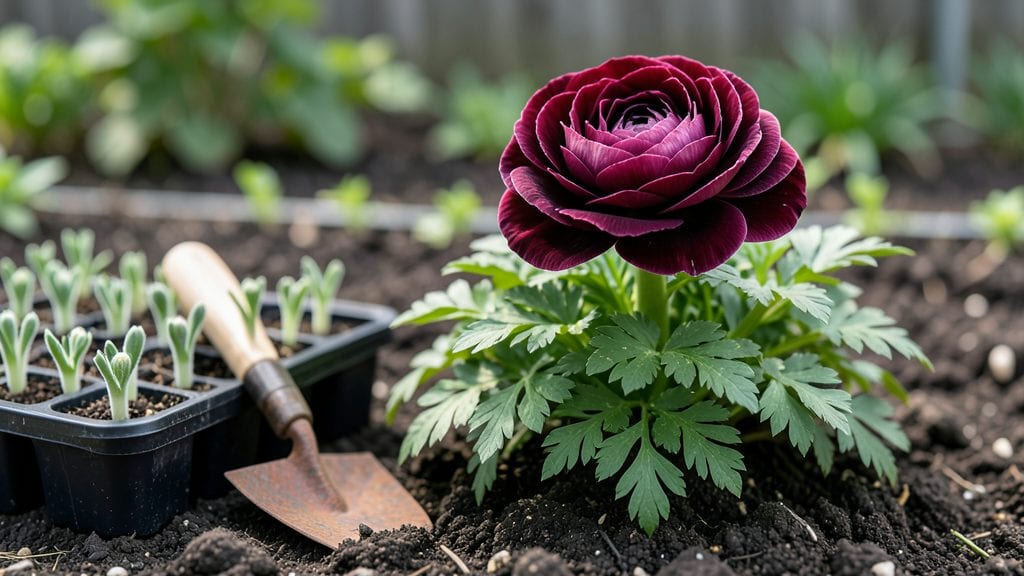
Planting ranunculus in the fall unlocks those shockingly lush spring blooms that make neighbors stop and stare. I learned the hard way that fall-planted bulbs thrive where spring-planted ones often flop—cooler soil and fewer pests set them up for success.
The secret isn't complicated: timing, soil prep, and a little winter protection work together to turn late-season roots into a spring spectacle.
You'll need a sunny spot with well-draining soil—ranunculus hates soggy roots—and bulbs planted about 3 inches deep, 2-3 inches apart. In colder zones (like mine in zone 5), a 4-inch layer of mulch after planting keeps frost from heaving them up.
The key is getting them in the ground 6-8 weeks before your first hard frost, so roots establish but don't start growing too early.
By spring, you'll see glossy, deep-green foliage pushing through before the blooms arrive—those classic layered, papery flowers in every color from white to deep magenta.
The payoff is worth the patience: cut flowers last 10-14 days in a vase, and the plants multiply over time, giving you more blooms each year with no extra work.
This method works in zones 3-9, though southern gardeners might need to plant slightly earlier. The only real challenge is remembering to mark their location—those early shoots can look like weeds before you spot the classic ranunculus shape.
Trust me, the spring show makes it worth every bit of fall effort.
📚 In This Guide
- What you need
- Instructions
- Tips and common mistakes
- Wrapping up and next steps
What you need
- ● Ranunculus corms: 20–50 corms (depending on desired coverage). Choose large, firm corms (1.5–2 inches in diameter) for bigger blooms. Pro tip: Look for ‘Butterfly’ or ‘Persian Jewel’ varieties for extra vibrancy! 🌸
- ● Well-draining potting mix: 1–2 cubic feet (for containers) or enrich garden soil with compost (aim for 6–8 inches deep). Ranunculus hates soggy roots!
- ● Organic fertilizer: A balanced 10-10-10 or bone meal (1 tbsp per square foot) to kickstart root growth.
- ● Mulch: 2–3 inches of straw or shredded leaves to insulate corms over winter.
- ● Garden trowel or bulb planter (for digging holes 4–6 inches deep and 2–3 inches apart).
- ● Watering can or hose with a gentle spray nozzle (avoid soaking the soil—moist, not waterlogged!).
- ○ Optional: Container: A wide, shallow pot (12+ inches deep) with drainage holes for urban gardeners.
- ● Plant labels (to track varieties if mixing colors).
- ● Epsom salt (1 tbsp per gallon of water) for a foliar boost in early spring.
- ● Timing: Plant 6–8 weeks before your first hard frost (typically October–November in most climates).
- ● Location: Choose a sunny spot (6+ hours of light daily) with protected wind exposure.
- ● Soil temp: Wait until soil cools to 50–60°F (corms need chill time to bloom!).
Instructions for planting ranunculus in fall
Here’s how to establish these delicate perennials for a stunning spring display—timing and soil prep are everything.
Prepare the Planting Site
Choose a location with full sun—at least 6 hours daily—since ranunculus thrive where they get maximum warmth. Work the soil to a depth of 12 inches, breaking up any compacted layers. The goal is loose, crumbly soil that won’t restrict root growth. Amend heavy clay with 2-3 inches of compost to improve drainage, as these bulbs rot easily in soggy conditions.
Ranunculus prefer slightly acidic to neutral soil (pH 6.0-7.0). If your soil tests higher, mix in 1 pound of sulfur per 100 square feet and re-test in 2-3 months. Avoid fresh manure—it can burn tender roots. Spread the 10 pounds of 5-10-10 fertilizer evenly over the area and lightly rake it in to distribute nutrients without concentrating them.
Plant the Corms at the Right Depth
Plant ranunculus corms 2-3 inches deep, spacing them 3-4 inches apart in rows 12 inches apart. The flat side of each corm should face downward—this ensures proper orientation for root development. If planting in clusters, stagger the rows to create a natural, layered look. Press the surrounding soil gently but firmly to eliminate air pockets around the corms.
Real talk: Don’t bury them too deeply. Corms planted deeper than 3 inches may struggle to push through the soil in spring, delaying or preventing blooms. Water immediately after planting to settle the soil and remove any gaps. Use a soaker hose to apply ½ inch of water evenly—avoid overhead sprinklers, which can dislodge corms.
Mulch and Protect for Winter
Apply a 2-inch layer of straw mulch over the planted area to insulate the corms and regulate soil temperature. Straw breaks down slowly and won’t compact like leaves or grass clippings. Avoid pine straw—its acidity can shift soil pH too quickly. Leave a 1-inch gap between the mulch and plant stems to prevent rot.
In colder climates (below 20°F), add an extra 4-inch layer of mulch or cover the bed with burlap sacks secured with bricks. This extra protection prevents frost heave, which can push corms out of the ground. Water the mulch lightly before freezing temperatures arrive—moisture helps insulate the soil better than dry mulch.
Monitor and Adjust Through Dormancy
Check the mulch monthly during winter to ensure it hasn’t compacted or shifted. If it does, fluff it up to maintain airflow and insulation. Avoid disturbing the corms themselves—even in winter, their roots are delicate. If you notice mold or excessive moisture on the mulch surface, remove the top inch and replace it with fresh straw.
In late winter (when daytime temperatures consistently reach 40°F), remove half the mulch to allow soil to warm gradually. This prevents premature sprouting, which can be damaged by late frosts. Once shoots emerge (3-4 inches tall), remove all mulch and apply a top dressing of 5-10-10 fertilizer at half strength to encourage robust growth.
Tips & tricks for perfect fall-planted ranunculus
A few strategic adjustments during fall planting will ensure your ranunculus emerge with vibrant, abundant blooms next spring. These details make all the difference between a modest display and a showstopping garden centerpiece.
Soil Preparation Insight: The 12-inch soil depth requirement isn't arbitrary—it ensures roots have ample space to establish before spring. For heavy clay soils, consider adding 3-4 inches of compost instead of just 2-3 inches to create better drainage. I've seen ranunculus fail completely in soggy conditions, so this extra layer can be the difference between success and disappointment. Use a soil probe to verify depth after amending.
Corms Orientation: The flat side down isn't just about aesthetics—it's about root development. When planted correctly, the corms will send roots downward while shoots emerge upward, creating a stable foundation. I've noticed that corms planted upside-down often produce stunted growth or fail to bloom entirely. Take the extra 30 seconds to orient each corm properly during planting.
Winter Protection Strategy: In climates below 20°F, the additional 4-inch mulch layer is critical. I've seen frost heave push corms out of the ground in colder zones, completely ruining the planting. For extra security, consider using a combination of straw and leaves—straw for insulation and leaves for additional bulk. Just be sure to remove any leaves that might harbor pests in spring.
Spring Transition: The late winter mulch removal at 40°F isn't about haste—it's about gradual warming. Removing half the mulch at this temperature allows the soil to warm slowly while preventing premature sprouting that could be damaged by late frosts. I've learned this the hard way after seeing tender shoots blackened by unexpected cold snaps.
Pro Tips for Fall Planted Ranunculus
- A few strategic adjustments during fall planting will ensure your ranunculus emerge with vibrant, abundant blooms next spring.
- Soil Preparation Insight: The 12-inch soil depth requirement isn't arbitrary—it ensures roots have ample space to establish before spring.
- Corms Orientation: The flat side down isn't just about aesthetics—it's about root development.
Frequently asked questions
Got questions about growing fall-planted ranunculus?
You’re not alone! Here are answers to the most common queries—so you can confidently plant and enjoy those dreamy spring blooms.
When is the exact best time to plant ranunculus in fall?
Plant 6–8 weeks before your first hard frost (typically late September to early November in most U.S. zones). This timing ensures roots establish before winter while avoiding early cold snaps. Check your local frost dates—consistency is key!
Can I plant ranunculus in containers or just in-ground?
Ranunculus thrive in containers (use well-draining soil and 6+ inch depth) or in-ground beds. Just ensure pots have drainage holes and place them in a sheltered spot to protect from harsh winds. Containers let you move them for optimal sunlight in spring!
What should I do if my ranunculus bulbs rot after planting?
Rot usually stems from overwatering or poor drainage. Plant in loose, sandy soil, and avoid soggy spots. If you suspect rot, dig up the bulbs, trim mushy areas, and replant in fresh, dry soil. A fungicide (like copper-based spray) can also help prevent future issues.
Are there low-maintenance alternatives to ranunculus for spring color?
Yes! Try tulips, daffodils, or crocus—they’re equally hardy and bloom early. For longer-lasting color, mix in pansies (plant in fall too!) or heather. Ranunculus offer unique frilly blooms, but these perennials require less fuss.
Do I need to mulch fall-planted ranunculus?
Light mulching (1–2 inches of straw or leaves) helps insulate roots but avoid piling mulch against the bulbs to prevent rot. In mild climates, skip mulch entirely—ranunculus handle winter well with just a dusting of snow for protection!
Still stumped? Drop your question in the comments—we’re happy to help you grow those showstopping blooms!
Wrapping up and next steps
Fall-planted ranunculus is your secret weapon for a burst of color in spring—no fuss, just stunning results! By following these simple steps, you’ll enjoy low-maintenance, high-reward blooms that brighten up gardens, containers, and even bouquets.
Whether you’re a seasoned gardener or a beginner, this late-season planting method proves that timing is everything for effortless beauty.
Ready to transform your space? Grab your bulbs, mark your calendar for October-November planting, and get growing! For extra inspiration, explore ranunculus care tips or dive into spring garden planning—your future blooms will thank you! 🌸✨