Diseases
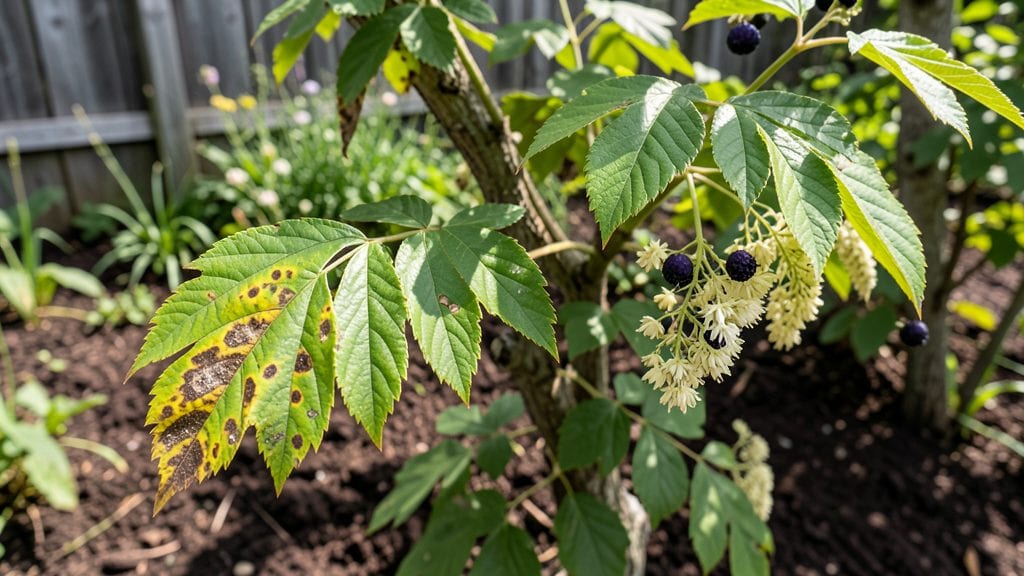
Spotting elderberry plant diseases early means saving your bushes before they're lost. ✨ I’ve seen powdery mildew turn vibrant leaves to gray in just two weeks—once you recognize the signs, you can act fast with simple fixes that work.
The key is watching for white powder, dark spots, or wilting stems. Most issues start with poor airflow or overwatering, so pruning and spacing make all the difference. With the right mix of organic sprays and cultural tweaks, you’ll keep your bushes thriving and productive for years.
📚 In This Guide
- What you need
- Instructions
- Tips and common mistakes
- Wrapping up and next steps
What you need
- ● Pruning shears – Sharp, sterilized shears (1 pair, blank">bypass-style preferred for clean cuts).
- ● Gloves – Heavy-duty, chemical-resistant gloves (1 pair, nitrile or latex).
- ● Fungicide – Copper-based (e.g., Bordeaux mixture) or sulfur-based (1–2 quarts, depending on plant size).
- ● Bacterial spray – Copper fungicide/bactericide (e.g., blank">Copper Soap) (1 quart).
- ● Hose with nozzle – Adjustable spray setting (for targeted watering).
- ● Disinfectant (bleach or rubbing alcohol) – For sterilizing tools (1 bottle, 70% isopropyl alcohol or 1:10 bleach-water ratio).
- ● Plastic sheeting or tarp – For mulching or covering infected areas (1–2 sheets, 4’x6’ or larger).
- ○ pH test kit – To check soil acidity (optional but helpful for fungal issues).
- ● Compost or organic mulch – Improves soil health and reduces fungal spores (5–10 gallons).
- ● Beneficial microbes – Mycorrhizal fungi or Trichoderma for soil health (1–2 packets).
- ● Neem oil – Natural fungicide (mix with water and soap) (16 oz bottle).
- ● Plant tags or labels – To track treated vs. untreated plants (pack of 20–50).
- ● Safety goggles – For handling strong chemicals (1 pair).
Step-by-Step guide to identifying and treating elderberry diseases fast
Here’s how to spot and stop the most common fungal and bacterial threats before they cripple your bushes.
🌿 Step 1: Scout for Early Signs on Leaves and Stems
Start by inspecting the top and undersides of leaves—this is where most diseases first appear. Look for black or purple spots (powdery mildew), yellowing between veins (leaf spot), or oily sheen patches (bacterial leaf spot). Check stems too for cankers (sunken, discolored areas) or dark streaks—classic signs of bacterial infections.
Real talk: I’ve caught powdery mildew early by just running my fingers over leaves. If you feel a white, powdery residue, that’s your first warning. Act fast—once it spreads, you’ll be fighting a losing battle. Grab your magnifying glass (if you have one) and check new growth first, since older leaves often mask early symptoms.
💧 Step 2: Prune Infected Branches Immediately
Use sterilized pruning shears (wipe blades with rubbing alcohol between cuts) to remove any branch with symptoms—don’t wait. Cut 6 inches below the last visible sign of disease to ensure you’ve got the whole infected section. Bag and dispose of pruned material in the trash (not compost)—this stops spores from reinfecting your plants.
Here’s the thing—don’t prune when leaves are wet. Wait until morning after a dry night so you’re not spreading spores everywhere. After pruning, sanitize your tools again and wipe down the bush’s trunk with a 1:10 bleach-water mix to kill lingering pathogens on the surface.
✂️ Step 3: Apply Fungicide or Bacterial Spray at the Right Time
For powdery mildew or leaf spots, mix neem oil (1 tablespoon per quart of water) with a dish soap drop as a surfactant. Spray early in the morning when humidity is low—this gives the solution time to dry before evening moisture sets in. For bacterial infections, use copper fungicide (follow label rates) and reapply every 7-10 days until new growth appears.
Don’t skip the undersides of leaves—that’s where spores hide. I like to spray until the point of runoff to ensure full coverage. If you’re dealing with cankers, apply a baking soda paste (2 tablespoons baking soda + 1 quart water + a drop of soap) directly to the wound. This creates an alkaline environment bacteria hate.
☀️ Step 4: Improve Airflow and Light Around Your Bushes
Thinning out branches to open the canopy (aim for 30% more space between stems) cuts down on humidity where fungi thrive. If your elderberries are planted too closely together, space them 6-8 feet apart—this is non-negotiable for disease prevention. Also, prune lower branches to let sunlight hit the ground, reducing damp soil conditions that fuel fungal growth.
Here’s what I do: I water at the base only (never overhead) and avoid late-day watering. If you must water in the evening, do it by 4 PM so foliage dries before nightfall. Mulch with 2-3 inches of wood chips (keep it 6 inches away from the trunk) to regulate soil moisture without trapping excess dampness.
⏰ Step 5: Monitor and Retreat as Needed
Check your bushes weekly during growing season (April–September). If you see new spots or powdery residue within 7-10 days of treatment, reapply your spray and consider adding 1 tablespoon of hydrogen peroxide (3%) per gallon of water) to your mix for an extra boost. For severe bacterial infections, you may need 2-3 applications spaced 10 days apart.
This is the moment that matters: don’t let one bad season become a pattern. If your bushes keep getting sick, test your soil pH (ideal range: 6.0–7.0). Too acidic? Amend with lime. Too alkaline? Add sulfur. Healthy soil = stronger plants that fight off diseases better. Keep records of what you spray and when—this helps you spot patterns fast next year.
Tips & tricks for identifying and treating elderberry diseases fast
These quick strategies will help you spot and stop elderberry diseases before they take over your bushes.
Timing is Everything: In Step 1, check your bushes early in the morning when dew is present—this is when fungal spores are most active and visible. I've caught powdery mildew within minutes of seeing that white, dusty residue on new leaves. Don't wait until the disease spreads to older leaves where it becomes harder to control.
Pruning Precision: When you're removing infected branches in Step 2, make your cuts at a 45-degree angle just above a bud or outward-facing branch. This encourages faster healing and reduces entry points for future infections. Remember, those 6 inches below the last visible symptom are critical—cutting too close leaves infected tissue behind that can reignite the problem.
Spray Technique: For Step 3, use a concentrated spray pattern that covers both leaf surfaces completely. I like to start at the bottom of the bush and work my way up to prevent drips from carrying spores to healthy areas. The point of runoff is your goal—this ensures full coverage without wasting product. For bacterial infections, add a drop of dish soap to your copper fungicide mix to help it stick better to leaves.
Soil Health Check: In Step 5, if your bushes keep getting sick despite your efforts, test your soil pH using a simple kit available at garden centers. Elderberries prefer a 6.0-7.0 range—too acidic (below 6.0) makes them more susceptible to fungal infections, while alkaline soil (above 7.0) can encourage bacterial growth. Amend with lime or sulfur as needed, but do this in early spring before new growth begins.
Pro Tips for Elderberry Plant Diseases
- These quick strategies will help you spot and stop elderberry diseases before they take over your bushes.
- Timing is Everything: In Step 1, check your bushes early in the morning when dew is present—this is when fungal spores are most active and visible.
- Pruning Precision: When you're removing infected branches in Step 2, make your cuts at a 45-degree angle just above a bud or outward-facing branch.
Frequently asked questions
Got questions about elderberry plant diseases?
You’re not alone! Here are answers to the most common concerns—from early signs to treatment tips—so you can keep your elderberries thriving.
What are the most common elderberry diseases, and how do I spot them?
Elderberries often battle powdery mildew (white, dusty patches), leaf spot (brown/yellow spots with black dots), and canker diseases (sunken, oozing wounds on stems). Check leaves, stems, and berries regularly—early detection is key! If you see these signs, act fast with fungicides or organic sprays like neem oil.
When is the best time to treat elderberry diseases?
Act before symptoms spread—typically in early spring (preventative fungicide sprays) or late summer (after harvest, to clean up debris). Remove infected leaves/stems immediately to stop spores from spreading. Pro tip: Morning applications work best—humidity drops as the day heats up, reducing disease risk.
Are there organic ways to treat elderberry diseases without chemicals?
Try these DIY fixes:
- Baking soda spray: Mix 1 tsp baking soda + 1 tbsp oil + 1 tsp soap in 1 gallon of water. Spray on leaves weekly.
- Neem oil: Diligently apply every 7–10 days to prevent fungal growth.
- Copper fungicide: Use only as a last resort—it’s effective but can harm beneficial insects.
Can elderberries still be harvested if they have a disease?
Not all diseases are equal! Powdery mildew rarely affects berry quality, but bacterial canker or leaf spot can contaminate fruit. Discard infected berries—never eat them raw. For safe harvests, pick only from healthy branches and sterilize tools between plants to avoid cross-contamination.
What should I do with elderberry plants that won’t recover?
If a plant is severely diseased (e.g., repeated canker outbreaks or dieback), it’s best to dig it up and destroy it (don’t compost!). Replace it with a new, disease-resistant variety (like Sambucus nigra ‘Black Beauty’) and sterilize your tools with rubbing alcohol. Prevention is easier than cure!
Wrapping up and next steps
Protecting your elderberry plants from diseases doesn’t have to be a daunting task—with the right knowledge and proactive care, you can keep them thriving! 🌱 By recognizing early signs of fungal or bacterial infections and acting quickly with organic or chemical treatments, you’ll safeguard your harvest and ensure healthy growth. Stay vigilant, act fast, and enjoy the rewards of a flourishing elderberry bush!
Ready to take action? Start by inspecting your plants regularly and treating any issues at the first sign of trouble. Your future berries—and your garden—will thank you!