Shrubs
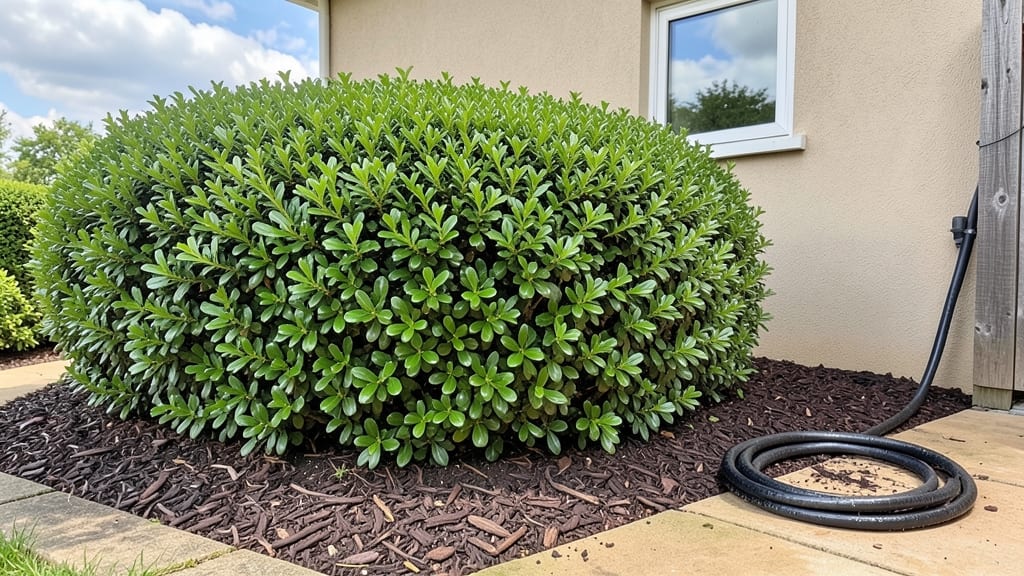
My boxwood foundation planting transformed our front yard from ordinary to strikingly polished—the kind of curb appeal that makes neighbors pause to admire. These evergreen shrubs aren’t just green walls; they’re the architectural backbone of a landscape, framing driveways, walkways, and entryways with precision.
The key lies in spacing them 18-24 inches apart for that clean, structured look while allowing room to grow without crowding.
Here’s the secret: boxwoods thrive with partial sun and well-drained soil, but their real magic happens in how you shape them. Shear them 2-3 times a year to maintain height and width, and pair them with complementary plants—like periwinkle or lavender for color contrast or hostas for texture.
They’re low-maintenance once established, but that first year demands consistent watering to root them deeply.
What you end up with is a timeless, high-impact border that holds up for decades. The glossy foliage stays vibrant year-round, and their formal shape elevates even the simplest home. Whether you’re framing a modern entry or softening a cottage-style porch, boxwoods deliver structure with elegance.
Let’s get into the details of spacing, pruning, and plant pairings that’ll make yours stand out.
Pro tip: For a foolproof look, start with uniform-sized plants—this ensures they grow together seamlessly. And if you’re working with a sloped yard, stagger the heights slightly for a natural flow. The payoff? A landscape that feels intentional, not just filled in.
📚 In This Guide
- What you need
- Instructions
- Tips and common mistakes
- Wrapping up and next steps
What you need
- ● Boxwood plants: 10–20 plants (depending on spacing—aim for 3–5 feet apart for mature size). Choose Buxus sempervirens (common boxwood) or Buxus microphylla (dwarf varieties for smaller spaces).
- ● High-quality topsoil or garden soil: 1–2 cubic yards (enough to amend existing soil or create planting beds).
- ● Organic compost or well-rotted manure: 2–3 bags (to enrich soil and improve drainage).
- ● Slow-release fertilizer (10-10-10 or 5-10-5): 1–2 bags (follow label instructions for application rates).
- ● Mulch (pine bark, shredded wood, or cypress): 1–2 bags (3–4 inches deep to retain moisture and suppress weeds).
- ● Garden hose with spray nozzle or watering can: For consistent hydration.
- ● Shovel or spade: For digging planting holes (12–18 inches wide and deep).
- ● Garden trowel: For finer adjustments and backfilling soil.
- ● Measuring tape: To ensure even spacing between plants.
- ○ Stakes and twine (optional but helpful): For temporary support if planting in windy areas.
- ● Pruning shears or hedge clippers: For shaping and trimming after planting.
- ● Gloves and knee pads: Comfort and protection for prolonged gardening.
- ● Soil pH test kit: Boxwoods prefer slightly acidic soil (pH 6.0–7.0). Adjust with lime or sulfur if needed.
- ● Root stimulator or mycorrhizal fungi: Boosts root growth and plant resilience.
- ● Drip irrigation system: For automated and efficient watering.
- ● Landscape fabric: Place under mulch to prevent weed growth.
- ● Edging tools: For clean, defined borders around your foundation planting.
Step-by-Step instructions for boxwood foundation planting
Creating a polished, long-lasting boxwood hedge requires precision in spacing, soil prep, and ongoing care.
Prepare the Planting Site for Optimal Growth
Start by marking your hedge line with landscape paint or stakes to ensure straight, professional edges. Boxwoods thrive in well-drained soil with a pH between 6.0 and 7.0, so test your soil and amend with compost or peat moss if needed. The planting trench should be twice as wide as the root ball but only 12 inches deep—this prevents root damage while allowing space for healthy expansion.
I always mix the top 6 inches of native soil with 2-3 inches of organic matter (like the compost from your ingredients list) to improve drainage and nutrient retention. Avoid heavy clay soils—boxwoods will develop root rot if water pools around their roots. If your soil is compacted, till in 1-2 inches of coarse sand to create ideal conditions.
Position Plants for Uniform Spacing and Long-Term Structure
Dig holes slightly wider than the root ball but no deeper—boxwoods hate being buried too deeply, which can suffocate roots. Space 4-foot-tall boxwoods 3-4 feet apart for a dense, mature hedge. For 3-foot plants, reduce spacing to 2.5-3 feet to allow foliage to fill gaps naturally over time.
Place each plant so the top of the root ball sits 1 inch above ground level—this prevents water from pooling at the base. I like to firm the soil around the roots with my hands to eliminate air pockets, then water deeply to settle everything. If planting in hot weather, do it in the late afternoon to reduce transplant shock.
Mulch and Water for Establishment
Spread 2-3 inches of mulch (like the shredded bark from your list) over the soil surface, keeping it 6 inches away from the plant stems to prevent rot. Mulch retains moisture, suppresses weeds, and regulates soil temperature—critical for boxwoods in their first growing season. Water deeply once a week during dry spells, aiming for 1 inch of water per week (more in extreme heat).
I avoid overhead sprinklers—they can spread fungal diseases. Instead, use a soaker hose or drip irrigation to deliver water directly to the root zone. After watering, check that the soil 1-2 inches down stays moist but not soggy. Overwatering is the fastest way to kill newly planted boxwoods.
Prune for Shape and Encourage Bushy Growth
Wait 6-8 weeks after planting before pruning—this gives roots time to establish. Use clean, sharp pruners to trim back any leggy growth or damaged branches. For a formal hedge, make cuts just above a leaf bud or branch junction at a 45-degree angle to promote healing. I never remove more than one-third of the plant’s foliage in a single season—this prevents stress.
Shape the hedge by trimming the top and sides evenly, using a string line as a guide for straight edges. For a natural look, allow some variation in height along the line. After pruning, apply a balanced fertilizer (like the 10-10-10 from your list) to support new growth. Boxwoods respond well to light, regular feedings rather than heavy doses.
Maintain Through Seasons for Longevity
Boxwoods need full sun to partial shade—6+ hours of sunlight daily for best color and density. In the first year, protect young plants from winter sun and wind by wrapping them in burlap or using a lightweight frost blanket if temperatures drop below 15°F. Mulch again in late fall to insulate roots during winter.
Monitor for pests like boxwood leafminers or mites—early signs include yellowing leaves or webbing. Treat infestations immediately with neem oil or insecticidal soap (from your list). Water deeply in early spring before new growth begins, then taper off as temperatures rise. With consistent care, your boxwood hedge will develop a structured, timeless look within 3-5 years.
Tips & tricks for perfect boxwood foundation planting
Precision and patience are the keys to creating a flawless boxwood hedge that will stand the test of time. These insights will help you avoid common pitfalls and achieve professional results.
Soil Preparation Secret: When mixing your native soil with organic matter in Step 1, aim for a texture similar to crumbly cake batter—not too dense, not too loose. This ideal consistency ensures proper drainage while retaining moisture. I've found that adding a handful of perlite to the 2-3 inches of organic matter creates even better aeration for those critical root zones. This small adjustment can make the difference between thriving plants and struggling ones.
Planting Depth Precision: The 1-inch elevation of the root ball above ground level in Step 2 is non-negotiable—it's the single most important factor in preventing root rot. Use a level to verify each plant sits perfectly, and consider marking your desired height with a pencil on the planting spade before positioning. I've seen too many hedges fail because this detail was overlooked, leading to waterlogging and poor establishment.
Watering Strategy: The 1-inch weekly watering guideline in Step 3 works beautifully in moderate climates, but adjust for your specific conditions. In extreme heat, I recommend splitting the watering into two sessions—morning and evening—to reduce evaporation loss. Always check soil moisture 1-2 inches down with your finger; it should feel like a damp sponge, not a wet rag. This tactile check is more reliable than any schedule.
Pruning Timing: The 6-8 week waiting period before pruning in Step 4 gives roots time to establish new connections, but don't be afraid to check earlier if your plants look particularly stressed. Look for new growth at the base as a sign they're ready. When pruning, I always make my first cut slightly above where I intend to end, then adjust—this gives me a better view of the underlying structure and helps maintain that clean 45-degree angle for optimal healing.
Pro Tips for Boxwood Foundation Planting
- Precision and patience are the keys to creating a flawless boxwood hedge that will stand the test of time.
- Soil Preparation Secret: When mixing your native soil with organic matter in Step 1, aim for a texture similar to crumbly cake batter—not too dense, not too loose.
- Planting Depth Precision: The 1-inch elevation of the root ball above ground level in Step 2 is non-negotiable—it's the single most important factor in preventing root rot.
Frequently asked questions
Got questions about creating a polished boxwood foundation planting? You're not alone! Here are answers to the most common concerns—from timing to troubleshooting—to help you plan with confidence.
When is the best time to plant boxwoods for a foundation hedge?
Plant boxwoods in early spring or fall when soil is workable but not frozen. Avoid extreme heat or cold—roots need time to establish without stress. Pro tip: Mulch after planting to retain moisture and regulate soil temperature!
How far from the house should I plant boxwoods?
Keep boxwoods 12–18 inches away from siding or brick to prevent moisture damage and allow airflow. For a 3-foot-tall mature hedge, space plants 3–4 feet apart in rows. Adjust spacing for larger varieties like ‘Green Velvet’ or ‘Winter Gem.’
Can I use other shrubs instead of boxwoods for a foundation planting?
Consider holly, juniper, or dwarf yew for low-maintenance options. For color, try azaleas or camellias (but note their acidic soil needs). Boxwoods excel for their neat, evergreen structure—but alternatives work if your climate or style differs!
Why are my boxwoods turning yellow or brown after planting?
Yellowing often signals overwatering or poor drainage. Brown edges may mean underwatering or heat stress. Check soil moisture (it should stay evenly damp, not soggy), and prune damaged leaves promptly. Pro tip: Water deeply 2–3 times weekly for the first month to help roots settle.
Should I prune boxwoods right after planting?
No—wait 6–8 weeks to let roots establish before pruning. Lightly shape in early spring (after last frost) to encourage bushiness. Avoid heavy cuts; boxwoods respond best to gradual, minimal pruning. Use clean, sharp shears to prevent disease!
Wrapping up and next steps
Creating a boxwood foundation planting is a rewarding way to elevate your home’s curb appeal while adding structure and charm to your landscape. With the right spacing, soil prep, and maintenance, your boxwoods will thrive for years—offering both beauty and functionality. 🌿
Ready to get started? Sketch your design first, gather your materials, and plant with confidence! Whether you’re a seasoned gardener or a beginner, this project is well within reach—and the results will be worth every effort.
Pro tip: Take progress photos to track growth and celebrate your hard work along the way!